Showing posts with label Crafting. Show all posts

February 7, 2010

Sunday Afternoon Diversions - Needlecraft Magazine 1967

 
Destash Alert - Purchase Here
Today I found this vintage Needlework & Crafts Magazine from 1967 in my bookshelf that is filled with amazing apparel to knit and crochet, felting projects, needlecrafts of all sorts and even wooden puzzle toys for the woodworker - definitely a catch all book for crafters.


If this type of magazine was still on the newstands today I would be picking up my copy every month.


Don't you just love the false eyelashes and uber size earrings in orange and pink?


I so want this crafting tote with the little girl with scissor handle wings - yes, the pattern is inside.

Crochet and knitted dresses for Spring - love them!

 
Another fun dress to knit.


Tons of crazy ads in the back - did women really wear these???


Wooden puzzle toy patterns for the woodworker - yee haw!


I love the red chaps and six shooter!


Love.love.love - this little caveman pattern.


Crochet cowgirl hat in time for Spring - pattern inside.


Knitted things for baby....


Knitted bikini - yes, the pattern is inside.


Fun coverups for the pool to crochet and knit.

I hope you enjoyed peeking inside this issue as much as I have and I am destashing and putting it in my online store for sale - Purchase Here.  It's part of my New Year's Resolution to destash, so here goes the first thing up for sale.  Enjoy!

October 20, 2009

Repurposing Knit Sweaters and Tshirts Into A Floral Hat

I made this little flower adorned hat for my niece, Tasha from repurposed clothing - a lavender turtleneck, a gray embroidered t shirt and a cotton floral skirt. This is an easy project and perfect for cast off garments from your closet.


The first step is to remove the turtleneck portion of the knit shirt. This becomes the hat itself once the cut end is gathered together becoming the top of the hat. Flower blossoms were made from circles cut from a gray t shirt and a floral cotton skirt in varying sizes.


I arranged the circles from large to small and stitched them in place with a needle and thread gathering the flowers a bit to give them dimension and ruffling the edges giving them the appearance of flower blossoms.
A braid was made from the gray and floral cotton to trim the edge of the hat with a smaller flower to conceal the two ends where they were joined together.
The gray rosette was made by taking a long strip of t shirt fabric pulling it out creating tension which rolls the fabric in on itself. I then wrapped the strip around and around to create the rosette and then stitching it in place. A leaf is made by cutting a leaf shape out and straight stitching it in place.Seed beads were added for a little sparkle and interest and the hat is complete. Tasha loved her new hat and I think it is a perfect way to keep her warm this Winter.

For more repurposed clothing ideas -

geezer.com - sweater
repurposeful.typepad.com - handbag
chezbeeperbebe.blogspot.com - yoga clothing

October 8, 2009

Wirework Earrings and White Goblin Pumpkins

Wisdom tells me I am nothing;
Love tells me I am everything.
Between the two, my life flows.
- Buddha
White Chrysallis Earrings

I begin every morning the same way, a cup of green tea, and pen in hand as I make my "to do" list for the day. I put everything that I want to do down no matter how insignificant and then prioritize the items on the list starting with the must do and usually stop after 8 items have been listed in order or importance.

I have learned that if I don't prioritize my day - it's gets away from me. How did we get so many things to do in any given day? Like finish jewelry for orders, doctor's appointments, kid duties, household chores, errands, watering plants, taking care of pets, returning phone calls to my friends, exercise, blog, etc. Stop the madness! But, we can't - can we?

So, it's back to the list... After I make my list I then place a time allotment on each item to see if I can get all of these things completed in just one day. If not, something has to go back on the list for the next day. It's hard to find the time to create in all of these responsibilities, but I must create or I get grouchy... I must create or I get bummed out. I must create or I loose touch with who I am...

Organic Earwires

Somehow, I manage to squeeze in studio time and share the photos of my work with you. Time spent doing what I love - learning new techniques and experimenting with sterling silver wire is me time - it's reminds me of who I am deep inside.

Earth Goddess Earrings

I long to spend one solid week in the studio, but I have been dreaming of that for a couple of years... Someday. Someday. Someday. Until then, I squeeze in studio time at least three times each week. I am trying to get inventory ready for a Holiday show and another show in early 2010. Will I have enough inventory? It's a good motivator to stay productive when I am in the studio. I organize my drawings in order of production so that when I sit at the bench I crank out alot of work. Every moment counts... This usually helps me stay focused, but there are days when I just struggle through and feel like I didn't accomplish much at the end of the day.
Labradorite Bliss

I take my creations to the farm with me and photograph them there in an environment that always brings out my creative side - it's quiet, peaceful and very relaxing. Exactly what every artist needs to allow the mind to play. I usually do my best design work there as well.
Angelic Totem Necklace

The light is always better in the country - why is that? My best photographic efforts happen there and when I come home after a long weekend I am ready to edit and post the photos of my work for this blog, and online stores.
Here is our beloved farm that we cannot imagine life without. How did we ever unload our stress before we could escape to the country? The double windows are the windows to my future studio that I will occupy when we retire someday.... I can't wait. We are still in the rennovation stage and I will share some photos in a future blog of what we have finished so far... The house was in really bad shape when we purchased it - it had been empty for a long time...
We planted white goblin pumpkins at the farm and this is the tiny beginnings of a tiny white pumpkin on the vine with the blossom still attached.
Another little pumpkin on the vine is so sweet.
Another pumpkin that I picked while we were there so I could bring it home with me.


See how sweet the pumpkins are in floral arrangements for your Fall table? Perfectly perfect.
If you don't have the room to grow your own you can recycle sweaters, sweatshirts, towels, etc. into fabric pumpkins that you can use year after year. Form into a ball tie string around the ends for a stem and then wrap the string around the ball to imitate the sections - it's that simple. Now go dig in your closets for cast offs in creamy white.

xo - Julie

July 9, 2009

Wirework Lampshade


Okay - stay with me......  I purchased a victorian style floor lamp without the original glass shade.  The floor lamp has wonderful jade and chartreuse glass combined with the gold toned ornate metal filigree.  I loved it, but I've had the lamp for almost a year and still had no solution for a lampshade that I thought would work with the style of the lamp.  I had considered a custom stained glass shade, a jadite bowl with a hole drilled in the bottom to allow for the wiring, but none of these solutions seemed just right. 

I have been mulling over the idea of soldered glass charms that I want to make and how or where I would hang them and it occurred to me that I could sculpt a botanical flower shape that would allow me to hang the charms that would sparkle nicely at night.

I shaped the flower shape - I was going for a fuschia shape - around two mixing bowls taped together.  This gave me the rounded shape I was after and then I started adding the additional wires vertically and horizontally.
This is the simple shape I started with before wiring more support wires around the top and the sides.

This is the bottom of the lampshade with petals of shaped metal that I hammered flat for extra strength.

This is the finished flower shape lampshade ready for soldered charms.  I added petals around the top and I think once the charms and faceted glass beads are added it will be sensational.

June 8, 2009

Wine Cork Trivet - Repurposing

I collect the corks from wine bottles as mementos of special occassions like anniversaries, birthdays, dinner with friends, etc.  I just can't bear to throw them away.  I began dropping them into crocks and glass containers, but after ten years that's alot of corks.....
On a trip to Napa Valley for a wine tasting tour I saw these trivets in a gift shop and thought it was an incredibly brilliant idea.  My corks could finally be put to good use and this is a great repurposing idea.  A functional creation that I would actually use!  

You local hardware store will have the metal hose clamps - just select the size appropriate for your trivet.  My trivets are approximately 8" in diameter.

Begin placing the corks inside the trivet until they become snug, adjust the height of the corks so that the top of your trivet is flush so your hot kettles will not topple off the counter top.  Once you have jammed the last cork in place, just tighten with a screwdriver to secure them in place.

These trivets make great gifts for wine lovers along with a nice bottle of wine.

March 17, 2009

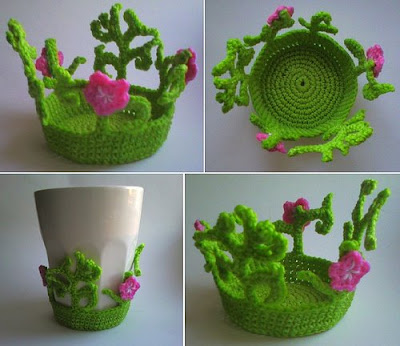
Extraordinary Crochet

In celebration of Spring, here are blossoms by TM - the Crocheteer from Sweden. Being an avid crocheter for the past - dare I say it? - 28 years..... Has it really been that long? Am I really getting that old?

Nevertheless.....I would love to crochet some of her designs, however without a pattern I could only get moderately close. She has mad skills with a crochet hook and I love her work.
I love this one with the removeable softie tucked inside. I would so buy this one...I want one of my own! I'll have to settle for the photo.....sigh.

Sprouty green scarf for Spring - now this one I may have to try. This scarf would be perfect for St. Patrick's Day.


These remind me of moss with tiny wildflowers on a slope in the deep forest - magical.


The best coaster ever! How does she get the sprouts to stand upright without falling over - starch or wires? I would love this coaster for my office. Another project I will have to try.
Visit TM -the Crocheteer's Flickr page for scrumptious crochet projects and inspiration.


October 19, 2008

Painted Vintage Boots

Marcy was inspired by the Paint Your Shoes blog and opted to embellish a vintage pair of boots from the 80s that she wore in Italy while learning how to sculpt marble.  She is unsure of how many miles are on these boots, but there has been enough wear to warrant new heels.
I love the colors of paint, orange, red, gold, sky blue and emerald green.  The medallion on the top of the boot is perfect and so Marcy.
The shaft of the boots have sunflowers and roses with a butterfly.  On the back of the heel is a green shamrock for luck.
Perfect painted boots in the gypsy bohemian style pair so well with her embroidered skirt.  Now Marcy has inspired me to paint an old pair of red boots I have tucked in my closet.  

September 23, 2008

Making Wool Acorns

With all of the acorns falling from the trees it is the perfect time of year to sew up some wool acorns.  I loved making mine while watching television.  I am a passive television viewer -  always have been.  I just can't sit through most television doing nothing but staring at the screen.  Boring.  

I save most of my handwork for evenings spent with my hubby while he watches television.  We get to be in the same room, and with TEVO if I miss something, he just rewinds and we watch it together again.  Married bliss - one of the way couples spend time together.

I would much rather listen to NPR or something similiar while doing my handwork, but hey, compromises must be made.


I gathered acorn caps and cut out the acorn shape from a vintage wool coat that was no longer useful, stuffed them with polyfill and glued them to the cap.  I made them in various shapes and sizes.  Cast offs become useful again.  Don't you just love that!?  
I used acorn caps from a Burr Oak tree I found in my local park while hiking.  I always take along a plastic shopping bag stuffed in my pocket just in case I find something interesting and want to bring it home - like these fabulous acorn caps!  
My husband, Dan graciously agreed to drill the caps with a drill press and I inserted tiny brass screws for vintage string to be tied for hanging.  They make great tree ornaments, look great attached to wreaths, hung from bare branches, or placed on your Holiday tree.

My acorns are available for purchase in my Online Shoppe.