November 13, 2012

Victorian Mourning Wreaths


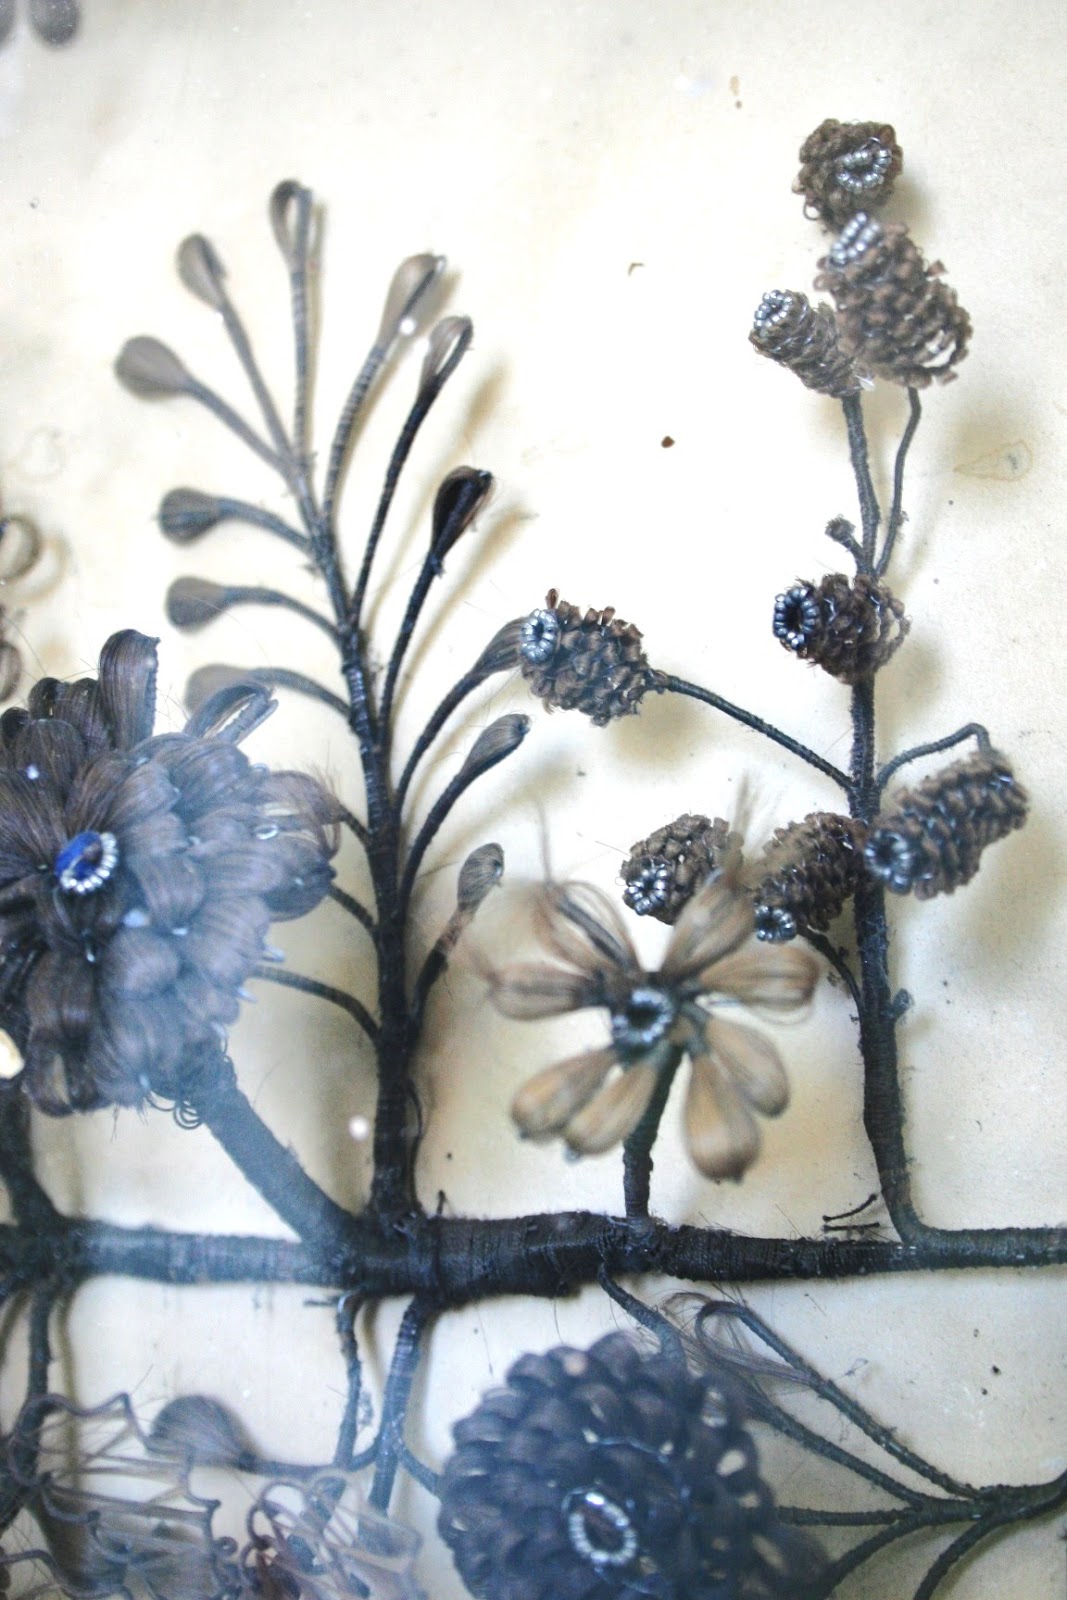
Victoran hair wreaths were created as a memorial for a single family member or included hair samples from an entire family.

This hair wreath was photographed in Iola, KS at the oldest jail in the state in the upstairs living quarters of the warden and his family.  Our historic restoration company is restoring the windows and while I was there taking photos of the building and work progress I took these photos of this wreath under glass.


I have seen many examples, but this is the first one I have seen made in a whispy manner with seed bead centers. 


Excellent proportion and scale with as much emphasis on the vines as the flowers in the work.


Every parlor had one of these wreaths under glass in the parlour in the Victorian era and is now a lost art, but great examples still remain many years later as a testament to the skill of the maker.

Lovely blond hair is collected and transformed into beautiful flowers.

Enjoy the Day My Friends-
 
Julie

November 12, 2012

Our Farmhouse Nest

 
nest (nst)
n.
1.
a. A container or shelter made by a bird out of twigs, grass, or other material to hold its eggs and young.
b. A place in which young are reared; a lair.
2.
A place affording snug refuge or lodging; a home.
 
This nest wasdangling from wild grape vines hanging from my giant red oak tree at the farm.  Having a weakness for birds and nests, I gently clipped the vines and nest from the tree and gathered them together with a bit of jute twine and it now hangs from a white cast iron bird hook in my dining room.


I have abandoned bird's nests scattered throughout the farmhouse sometimes nestled into a ironstone bowl, under a glass dome or in a vintage jar.  They are in every room of the house with the exception of the kitchen.


I think the nest and grapevines look great hanging from the bird hook against the white door.  The grapevine has dried blue grapes in clusters on the vines.

 
Ah yes, Life Is Beautiful, don't you think?  A new bracelet in French fresh from my studio that sums up those little nests...
 
Blessings My Friends,
 
Julie

August 14, 2012

Angels Are Always There

Encouragement Bracelet - Purchase Here

Recently, I was reminded that angels are always there when you need them.  The reminder arrived in an email request from a lovely woman who wanted to give her close friend something special to let her know that she was loved dearly before her surgery date later this month.  Her friend was diagnosed with an aggressive cancer and they were both reeling from the news.

 She wanted to offer her friend a heartfelt gift - something special for encouragement and an offering of hope as her friend begins her journey through cancer treatment or is it really torture?  Well, it is really both.  We have all been touched by cancer in our lives whether personally or through our family and friends.  It is a journey that takes you both through hell and back.  The angels in our lives are never more important to us than at these moments.

We designed this piece together and many expressions were considered, but this is the one that rang true for her.  It is my wish that her friend finds a moment of peace whenever she looks down at her wrist and sees this bracelet as she is receiving her chemotherapy treatments. It's those little moments that become so important when your life is on the line and you need a bit of hope to get through the day.

As a jewelry maker, it is rewarding when you know that your creation is going to make someone feel special.  It is the type of art that can be worn and travels with the wearer, hopefully bringing them little moments of peace and gratitude for their earthly angels that are always there when they need them.


It is finally sprinkling tiny rain drops today and I sense that the trees are as happy as I am to feel the happy wetness washing away the dust of the dry days we have been having of late.  I ventured out for a morning walk and every living soul on the trail looked energized and happy by the cooler temperatures and promise of rain.  It was a great way to start this day.

Blessings to you my friends,

Julie

January 21, 2012

Your Are Stronger Than Steel Ring Set


I enjoy wearing statement jewelry or wearable art.  A ring is the perfect accessory to show off your unique style and the sky is the limit in regard to size and the amount of sizzle you wish for the day.

This is a series of rings I designed for the

You Are Ring Series.


You Are...
stronger than steel
more precious than a saphire
rare as a pearl
more valuable than gold
and I love you.


 The rings feature steel wire cores with 14kt gold filled wire wrapping with a huge lustrious pearl with 14kt gold beads and semi precious stones like iolite, garnet, peridot, amethyst, saphire, carnelian, labradorite, etc.

 All in varying heights, this one sits about one inch above the finger and is so fun to wear.  It's my favorite architectural ring of the group.


 This is the mid range height ring that sits about 1/2 inch above the finger.  The two round loops at the bottom elevate the ring and is an interesting design element.  It also keeps the ring sitting upright and at the proper alignment on your finger.


This is the standard version or expected version.  It is a straight forward design that sits directly on the finger.

 The steel wire is treated with a protective coating that prevents rusting and keeps the steel looking black and shiny.

 There's something about the blend of ying/yang that is fascinating to me.  Delicate yet strong, feminine yet masculine, soft yet hard....it surfaces in my work again and again.  I love it.

Happy Creating and Blessings to you my Friends,

Julie

January 17, 2012

Statement Turquoise and Silver Rings


At the prompting of my followers, I am back to share what I have been creating in the studio.  Hence my absence from blogging lately.  With the Holidays, came all of my wonderful clients requesting special pieces for presents and I was happily busier than ever.  Thank you for the opportunity to create lovely things for you to bestow upon loved ones.  It is always my pleasure to do so...really.

I love turquoise and use it alot in my work and when I found these giant cabachons I was smitten and knew immediately that I wanted to create some really large silver and turquoise rings with them.  When I say large, that translates to three inches across and two inches in height.

The nail color I am wearing is call Chinchilly by Essie...


A bezel was made to fit the stones and soldered to a sheet of silver that I cut to the shape of the cab and then textured around the edges.  Staying true to the "wordie" in my soul, I added the word "MYSTIFY" to the silver rim encircling the cabachon.

Once the bezel is in place and the alot of polishing, the cab is set in the bezel and the bezel is formed around the edge of the stone to hold it in place.  The ring above is another version of the ring, in a more rounded shape and this one is over three inches across and almost three inches in height.  I added the word "Enthrall" to rim of this one.
The turquoise cabachons sit on a wide sterling silver band which gives the ring stability on the when worn.


I added rose brass bobbles around the rim of this one that is more of an egg shape in a light turquoise color that works really well with the warm bronze color of the brass.  The brass bobbles were added three at a time and was very time consuming and I am not sure I will add them again in the future as they were tedious to the extreme.

I am continuing to work on the series of rings and hope to have another 4 or 5 ready for an upcoming show the first weekend in February.

I hope you like them and thank you for your reminders that I need to take a minute, photograph my work and share with you.  It's so nice to be missed, isn't it?

I have some other new pieces that I am working on as well and will give you a sneek peak before I sign off today.


A lariat style necklace with lovely blue fire crystal briolettes and nature pearls in clusters on a brown crocheted necklace in the tiniest silk thread with a silver heart clasp.  The briolettes flash blue, gray and turquoise...it's really striking and so comfortable to wear you'll forget that you are wearing it.

Blessings,

Julie

October 31, 2011

Winter White Aran Knit Chair Cover


and yes....

there is a matching ottoman cover.


Hand knit by South African designer, Lynn Garrett and yes, you can buy these on etsy by using the link beneath the first photo.

I hope you are snuggling in by a crackling fire during these cold Fall evenings with something scrumptous on your knitting needles.  The trees are ablaze with color in hues of brilliant orange, red and gold and seem unusally beautiful this year, don't you think?


It's time once again for the annual Pie Supper held in a one room school house called the Independence School, that my Dad attended when he was a little boy.  The local women of surrounding area bake a variety of pies like, coconut, apple, pumpkin, blackberry, peach, pecan, black walnut & raisin, chocolate, butterscotch, banana and cherry.  They also bake cakes for the cake walk.

Everyone in the community crowds into the one room schoolhouse - it's usually standing room only with the tallest in the very back.  Then the auction begins...children go first, bidding on their favorites.  Once the children are happily eating their pie,  the bidding begins by the adults.  Once everyone has a piece of pie, multiple pieces are placed in plates featuring a variety of pies that are auctioned off until every last slice of  the pie is gone for another year.

The proceeds benefit the upkeep of the school building for another year.

The local quilting club raffles off a quilt and they usually put on a few skits that are always a crowd favorite.  Hymns are sung and of course finishing with God Bless America.  It's old fashioned country fun at it's best.

Wish me luck getting a piece of my favorite - black walnut and raisin which is always sold quickly.  For those of you who would like to try a slice of heaven, here is a recipe for you to try.

Black Walnut and Raisin Pie


by Andrea Spring

CRUST

1-1/2 cups Crisco shortening

1 tsp white vinegar

2 T milk

1/2 cup hot water

4 cups all purpose flour

2 tsp salt

1 T cornstarch

Combine shortening, vinegar and milk. Pour in hot water. Mix well. In separate bowl, mix together flour, salt and cornstarch. Combine flour mixture with shortening mixture until dough forms. Separate into four equal balls. Wrap in film wrap and refrigerate 1 portion and freeze remainder for future use. Refrigerate for at least one hour before rolling out.

FILLING

3 eggs

2/3 cup granulated white sugar

1/4 tsp cinnamon

1 tsp vanilla extract

1/3 cup melted butter

1 cup dark corn syrup

1 cup dark raisins

3/4 cup chopped black walnuts

Mix eggs, vanilla extract, sugar, cinnamon, butter and corn syrup until well blended. Add black walnuts, mix well. Set aside.

Preheat oven to 400 degrees. Roll out one portion of pie dough. Place in 10 pie pan. Sprinkle raisins over bottom of pie shell. Carefully pour filling over raisins. Bake for 10 minutes at 400 degrees. Lower temperature to 350 degrees for 30 minutes or until center of pie is just set.


Happy Fall and Blessing My Friends - Julie


September 30, 2011

Smitten With Vintage Silver Spoons


I had so much fun at the UNPlaza Art Fair last weekend, it was glorious Fall weather - the kind that makes you look up and give thanks for such a blessing to enjoy.  Thank you all for stopping by to see me at the show - loved.loved.loved seeing you.

One reoccurring discussion at the show was the deep love we ladies have for two things....vintage shell buttons and silver spoons.  Once being referred to as waumpom  No one really knew why they were drawn to them - it's one of those indescribeable things we ladies have in common - young and old.

This is my latest leather cuff featuring - yup, a vintage silver spoon.  The leather is soft, wide and black.  I love it so much that I will be adding more of them in different versions to my etsy shop soon.  If I can keep them in stock, I will have them at my next show which is coming up soon.

The Shawnee Indian Mission Fall Festival in Fairway, Kansas on October 8th & 9th.  I will be sharing a booth with the lovely ladies of the Kansas City Fiber Guild - how fabulous is that???  It's that time of year to get your "fiber" on and these ladies know how to create extraordinary wearable art pieces that are a must see and add to your Fall wardrobe.  Hope to see you there.

Blessings to You - Julie

September 18, 2011

How To Paint Leather Boots


It's time to pull your boots out of the bottom of your closet, dust them off and get your paint out and breathe some soul into them.  It's quick, fun and you get a new pair of kicks for about a one hour investment and $15 in materials.

Start by selecting the "it" pair of boots from your collection.  I know that you own at least three pair of cowboy style boots.  I would suggest choosing your least interesting pair that you hardly wear anymore but can't bring yourself to give away.

Gather your supplies. 

You will need the following:

Sandpaper - 160 grit
Two soft cotton cloths (old t-shirts work great)
Alcohol - rubbing alcohol works great for this application
Acrylic paints - your favorite color of the moment and a mahogany, deep plum, or walnut shade to add depth and distress
Oil - Linseed (any conditioning oil) to condition and protect the color
Boot polish in a clear or transparent color

What I used for mine...Sage Green and Dark Plum acrylic paints.

I started with a pair of white boots so if you want the lighter shade coming through like mine you will need to paint the boots white first and allow to dry completely.

Got it all together?  Then let's go.

Start by sanding all surfaces of the boots which will remove the sealer and rough the surface so that the paint will soak into the leather.  Do not sand to the point that you have removed all of the base paint color.  Sand with a light touch.  

I  did sand some areas of my boots down to the natural brown leather beneath the painted surface to reveal a nice brown area which also distresses the leather and will add depth of color.  DO NOT SAND your stitching as your boots will come apart at the seams literally.  Excuse the pun.

Once the two boots are similar in distressing and you have sanded all areas it's time to paint them in your favorite base color.  Squeeze your acrylic paint into a cup and add a 1 part alcohol to 4 parts paint ratio and mix thoroughly.


Now paint your boots.  I used a wool swab, but a sponge applicator would work as well.

Now before the paint is completely dry, take the soft cotton cloth and wipe away some of the paint to reveal the color beneath.  Let dry for about 5-6 minutes while you paint the other boot and rub away some of the paint so that the two boots match.

Remember you can apply the paint, sand and reapply the paint as needed.

Now, back to the first boot.  Add your darker acrylic paint to a cup adding alcohol again in a 1 to 4 ratio, mix thoroughly.  Begin lightly applying the darker paint over the base color a section at a time like a wash.  Before the paint dries take your soft cotton cloth and gently wipe some or most of the darker paint off revealing the base color underneath.  Repeat for the rest of the boot and then continue the process on the second boot.

Allow to dry for 10-15 minutes.  Then sand again if you like until you achieve the amount of distressing that appeals to you making the boots your own or adding your soul to them.

Now rub the linseed oil or any conditioning oil made for leather into the leather slowly so that it has time to soak in with a clean soft cotton cloth.  DO NOT USE the same cloth you used that has paint all over it.  C'mon!

Now apply the boot polish per label instructions.

There you have it, a great new pair of new kicks for Fall for about $15 investment.

These are the boots I purchased from a seller on etsy that I distressed and painted.  I love.love.love my new one of a kind, unique to me boots in my favorite shade of mossy green.

I'd love to hear about your boots once they are finished.

Blessings my Friends - Julie

September 8, 2011

Prairie Fire Gemstone Earrings

For me Fall weather just gets me excited...I am already thinking about cozy sweaters, crisp Fall mornings, beautiful Maple trees in flaming red hues, hot chocolate at Football games and pear & cranberry crumbles with vanilla ice cream.  Our temperatures dropped to a very pleasant 70's range which was so nice after the 100+ degree temperatures we have been experiencing over the past month. 

I believe that all of the Earth's creatures were delighted with the cooler temperatures and the rain.  Even the trees seemed happier.  Were the birds singing more than usual or did I just imagine it in my happiness?

Thinking of the upcoming Fall colors inspired new gemstone earrings loaded with garnets, cherry quartz, carnelian, smoky topaz, citrine and lemon jade.


They are large earrings that dangle three inches but are so lightweight and comfortable to wear.  I like to wear them with a crisp white blouse and my favorite pair of jeans.


I have been wire wrapping gemstones in various color palettes of blue, green, brown, and golden yellows... I have added a few pairs to my etsy shop if you would like to pop over for a peek.  I have been busy.busy.busy and shipping my jewelry all over the world.  It's so rewarding.  Whenever I create a piece of jewelry I never know where it will travel and I love that.  It's a pleasure to send my creations off to Norway, Sweden, Japan, Australia, United Kingdom, France, Italy, Czechoslavakia, New Zealand, Taiwan, Spain, Canada, Finland, and Singapore.  Thank you all for your kindness and support.

We lost our favorite Uncle a couple of weeks ago and we are still reeling from it.  He was such a wonderful man that was so kind, generous and a fellow artist.  He was a wood and stone sculptor who created lovely hand carved angels and sculpted animals in stone.  I'll post a blog about him and some of his work later...when I can bear it.  It's just to soon.  I know you understand.  I miss him so much.  We all do.

So, I have been doing things that Dale would have enjoyed.  Spending time outside enjoying nature and spending time in the studio creating.  I have been experimenting with steel wire creating organic formed neck pieces with stitched sheer fabric and thread.  It seems he is with me wherever I go and I can remember his laughter... which always makes me smile.

I hope you are all well and enjoying your family and friends.

Blessings my Friends - Julie

August 29, 2011

Vintage Typewrister Photography and a Collection


While at the farm this weekend setting up a special pie safe cabinet that I began filling with my found objects gathered over the years I paused for a moment and gazed at the vintage typewriter I have in the foyer.  I kept sweeping past as I gathered objects from cabinets, drawers and shelves to add to the shelves of the pie safe upstairs.  Each time I would pass the typewriter I couldn't help but gaze at the keys as I swept past.  It's one one my favorite accessories.


The third time I passed the typewriter, I had to pause and grap my camera for a few quick shots as I knew that until I satisfied my visual self the work upstairs would be a distracted attempt at best.


I adore this old typewriter that I found in a junk haunt of mine several years ago.  I can't imagine life without it at this point.  It gives me pleasure every time I pass it in the hall as I go up or down the stairs.


Inspired by Sibella Court's book, ETCETERA where I fell in love with her cabinet filled with her personal collections of seashells, antlers, bugs, etc.  I have decided to gather my own personal collection together in one cabinet a vintage pie safe I purchased from my dear friend, Allene years ago.  It's the perfect size to hold my collection and it sets in the upstairs hallway of the farm.

I have these wonderfully personal things stuffed in drawers, cabinets, shelves tucked away out of sight as they really don't blend well with my usual decor.  But, they make me so happy when I open a drawer and find them inside.  Encourage by Sibella to live this these collections and share them with others I started gathering them together.  It will be a process as they are stashed away in boxes and containers virtually in every room of my house.  My little totems...

I added a tiny figurine of a dog with a ball which reminds me of my little Molly who lives to chase her ball.  A seed pod from my garden last year and a wooden printer's block of a W for my maiden name of Williams.  A bone china oval bowl holds more pods. an owl feather and a chandelier crystal.


This guy is one of my latest acquisitions a taxidermy aligator that I love is perfect for my shelves.  I plan to add my little wooden box of rattlesake rattles and a tortoise shell.  When I carried this little fellow up to the register to purchase him the owner of the show said, "NOOOO, you are not going to buy that!!!"  I laughed and told her that yes indeed I was going to do just that.  She couldn't imagine what on earth I would want with him, but I love it and felt it was a steal at $22.


A vintage glass bottle holds tiny glass buttons, a carved owl in white, a translucent marble bowl from Italy, a wasp nest, a vintage watering nozzle and large apothecary jars that shimmers in the light.


An old pulley wheel holds one of my autograph books from 1948 open with a dried zinnia bloom next to a silver tray holding vintage chandelier crystals and papery money plant pods.


Another pulley wheel, a tiny whisk broom with a green velvet top, a transfer ware pitcher in shades of the same hue of green, vintage bottles and a magnifying glass for up close viewing.


A watercolor of a farm scene behind the Last Supper souvenir from Italy that I love.  If you look closely you can see the windmill...it's painted in lovely hues of green and is very old and crumbly.

I will add more photos for you as my collection takes form in the pie safe over the next few months.  I plan to add more feathers, shells, antlers, apothecary bottles, magnifying glasses, fossils, vintage binoculars, a doll head I salvaged from a fire and a few botany books I have on hand.

My own personal eclectic collection of things I treasure and enjoy.  Thanks for the inspiration Sibella!

How do you live with your personal collections?  Are they trapped in boxes and drawers?  Are they spread out on a tabletop or showcase?  I'd love to hear about your collections and how you live with them.


Blessings - Julie